
Scaling a process that is running in a distributed system is difficult enough without having to deal with the same pitfalls every single time. When the requirements of your system change, you might be tasked with ensuring that a process can run more efficiently in multiple instances of your service. If you have to deliver to a tight deadline, you might be tempted to start coding right away in an effort to save time.
But if we don’t take a step back to create a plan that will deliver your solution safely, you risk getting stuck, missing growth opportunities, and ultimately spending even more time as a result of it.
In this blog, we discuss a specific strategy that can help you avoid all that and use it to iterate on a scalability improvement, while moving quickly and not breaking anything.
Avoid the pitfalls of improving a process
Let’s say we have a scheduled process which is supposed to update all user subscriptions for products with recent changes. This process needs to be able to safely migrate millions of subscriptions by executing the work in two phases:
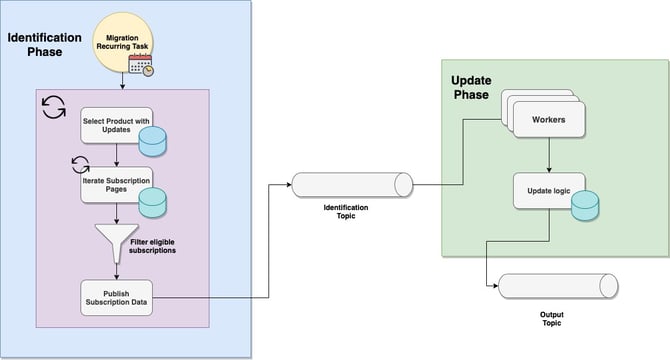
- Identification Phase – determines what products have changes and identifies all subscriptions that are eligible to be migrated
- Update Phase – multiple workers process incoming subscription information and update all necessary rows in the DB
Goal: The initial phase of this process can be executed only one instance at a time, so we need to come up with a solution that will allow it to scale horizontally and better handle the traffic load.
Even if the requirements seem clear, we all know that implementation often takes longer than we initially anticipate. There’s always something that goes wrong and we’ll be leaving out a lot of details here, but we’re going to do our best.
Too much ambiguity
Despite always observing our requirements, in many cases, the actual code will give us more insight into what is feasible to deliver in a given time. If we don’t explore the path to the solution prior to actually developing it, we might not identify certain bottlenecks, constraints or other critical points early enough.
By doing a quick code traversal and noting down all the high-level interactions, we can bring more technical clarity as well. This can point us to where we must start our work and even change our initial understanding of the problem.
Once we’ve completed the first traversal we can build a before and after picture, which looks like the one below. In the gray sketched-out square we’ve delimited what our improvement area will be.
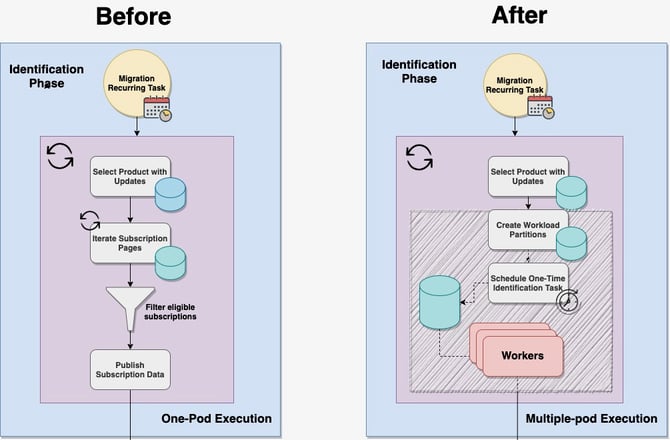
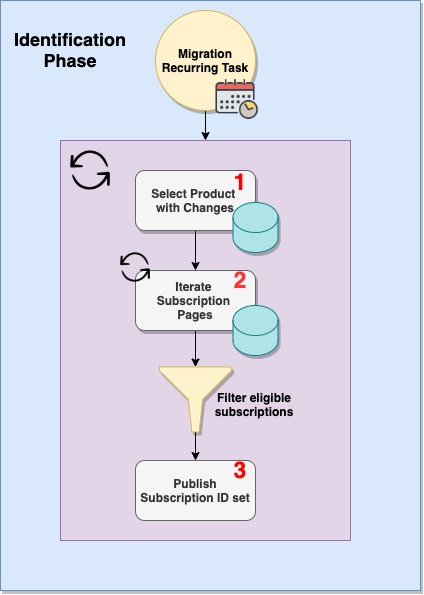
Our process is scheduled periodically by a third-party library called db-scheduler. Once the process starts, there is one instance that checks for products with recent changes and then iterates through their subscriptions. The iteration is done using a datetime pagination strategy to avoid DB performance issues. As subscriptions get processed, the information necessary to update all records in the DB are sent on a Kafka Topic where multiple consumers can process the data.
Our plan is to split the dataset and create multiple partitions which can be processed and tracked in the DB. Once all partitions are formed, we can trigger ad-hoc jobs which will be picked up and handled by any available instance of our service. We have to ensure the rest of the workflow will stay the same.
No risk assessment
Now that we can see the path ahead and the boundaries of our code improvement, we can zoom in on the ‘after’ portion of our picture and break down the solution.
After observing the diagram above, it is clear there are multiple things that need to happen for our process to scale successfully. If we break down the task at a high-level, we can see more clearly which items have a higher risk and how we should prioritize each subtask.
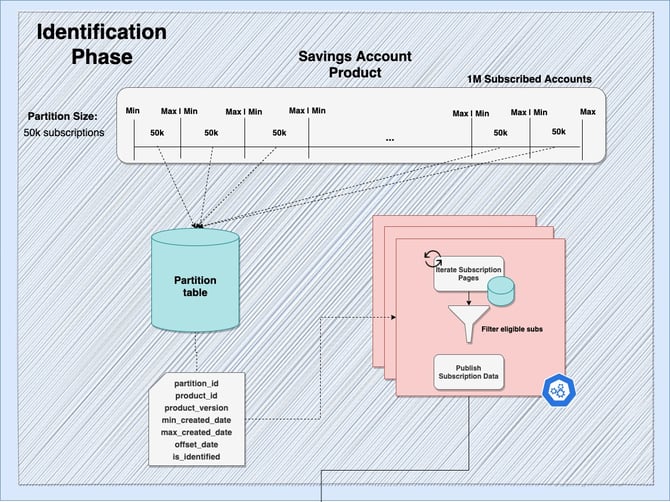
1. Workload needs to be split into multiple partitions which do not contain overlapping data
- Due to performance considerations, the only way we can paginate over millions of subscriptions is by using the created_date fields.
- We need to create a query that can be executed once and return a list of (minCreatedDate, maxCreatedDate) pairs. These will delimit the work of each partition.
2. All the information required and produced by each instance needs to be stored and tracked
- The product_key and product_version, with the (min_created_date, max_created_date) pair will be stored in the DB for each product.
- To ensure work can be continued if processing fails, we will also store an offset_date and a flag that will indicate if the partition was completed.
3. An orchestrating component will schedule ad-hoc jobs and lock the data
- We can use db-scheduler, which has a feature of scheduling one-time tasks and locking the rows so that only one instance can pick up the work.
4. Ensure that any other process that we observe in our code landscape will not be affected by our change.
- Code traversal uncovered another scheduled process that works with multiple key points in our code, so we’ve duplicated those methods and will modify only the slice of code that is isolated to our feature.
Looking at the subtasks above, maybe you haven’t used db-scheduler's OneTimeTask feature before. Or maybe you’re not sure how you would implement that DB query which is supposed to create the workload partitions. But whatever it is, now we should know the most important thing we have to figure out.
Optimizing too early
The tasks above can be done in many different ways and there will always be a better solution. So, we should know what the nice-to-haves are and what is crucial for us to deliver an acceptable solution in good time. We have to deploy eventually, right?
Instead of trying to come up with the best way to develop each step, we can focus on delivering the highest priority tasks first and provide acceptable, production-quality implementations for everything else. This should ensure that you don’t spend too much time on any task we already solved before and is not critical to the project.
Once you have a working solution, you can rest assured that it will satisfy all requirements and be delivered in time. You can now pick and choose what parts of your implementation you want to continue improving (if you still have any time available).
Sometimes, however, there is no amount of designing upfront that can help you safely deploy in good time. But there is another parameter we can tweak that can speed up the process and have some other unexpected benefits as well.
Speed up source code navigation
The quicker you implement an acceptable solution, the more time you have to experiment and come up with better alternatives. The extra time you get from a speedrun can also open up some new opportunities and improve your overall experience of developing the actual code. It’s important to mention that speedrunning needs to be used on a case-by-case basis and is most useful when implementing your first prototype.
“Speedrunning is the act of beating a video game, or segment of a game, as quickly as possible while adhering to a set of rules that have been established by the game’s individual community.”
Making programming more fun
Paradoxically, by trying to write code faster, you can deliver a solution more safely and it can help you have more fun while doing it as well. If we don’t prepare our code session and minimize all things that cause friction, it will be very challenging to enter those good ol’ flow states where every line of code just clicks. Here are a couple of prerequisites:
- Have two versions of your repo cloned. One of them is on the latest commit on develop, and the other is on your feature branch. This way, if one of your changes produces unwanted behavior, you can easily debug the original execution flow and compare variable states
- During your next code traversal, don’t be shy to leave comments which can act as your scaffolding while you build your implementation (you don’t have to commit them)
- Refresh your memory on your IDE’s most useful shortcuts
- Have any documentation easily accessible (ideally open in a browser without > 100 tabs open) and a timer set up for your coding speedrun
- Notifications turned off for the period of the session (duuh)
Death by a thousand cuts
A considerable amount of time is lost while using a mouse to do repetitive actions. Doing a refresher on the most important shortcuts in your IDE can go a long way to help you implement your solution faster and make your path to the finish much smoother.
Here’s a short (and no way exhaustive) list of must-know shortcuts you can use in IntelliJ IDEA if you’re running on Mac. The same can be achieved with any IDE either out-of-the-box or through setting custom shortcuts with plugins.
| Action | Shortcut | Notes |
| Jump to next compiler error | F2 (or Fn + F2) | This works both in the project tool window and the source window |
| Rename Refactor | Shift + F6 | Works on classes, methods and identifiers |
| Jump to line | Command + L | Works in the source explorer |
| Navigate Search occurrences |
Command + G: next occurrence Command + Shift + G: previous occurrence |
This works in the keyword search within the source explorer |
| Jump to next code change | Control + Alt+ Shift + <Up/Down arrows> | This works in the source explorer |
| Step back/forward | Command + [ or ] | This works in the project tool window and the source explorer |
| Highlight identifier | Command + ‘ | MultiHighlight plugin needs to be installed. Very useful in finding all targeted interactions quickly |
| Set/jump to numbered bookmark |
Control + Shift + <numpad>: sets bookmark Control + <numpad>: jumps to bookmark |
You can set bookmarks on specific classes or on specific lines of code. Might require plugin for other IDEs |
There are many repetitive actions we do that might have default shortcuts in our IDE. If you’re using IntelliJ IDEA, you can install the Key Promoter X plugin which will show you every time you execute an action that has a shortcut set by default. Shout-out to a colleague, Darren Ward, who told me about this one.
Unexpected benefits
During the second code traversal, we can use the shortcuts defined above to set up bookmarks to the most important points in the code, which map to our before picture. These bookmarks, together with the comments we’ve left during our first traversal will have enabled almost instant context immersion.
This will come in handy if you’re dealing with unreadable code and you’ll thank yourself every time you step away from the computer. Besides that, the diagram, and the improved navigability means we can explain any issue much more easily.

Improve your engineering collaboration skills
Now that we can quickly pass through the code landscape, we can use all the information we’ve created whenever we have to give a status update or brainstorm an issue. If we always have the before and after picture pulled up and our bookmarks are ready to go, we can communicate much faster and save ourselves a lot of time and confusion.
Expert opinions and alternative solutions
Maybe you’ve had a tough time coming up with a performant SQL query that will return all the boundaries for your workload partitions. You can try to power through until you figure it out. But you might have a dedicated DRE team (or just someone who’s really into DBs) that has spent way more time finetuning query performance than you have.
It doesn’t take long to create a support ticket or schedule a Zoom call. There is no real downside to asking for help. If people are too busy, you will have spent 10 minutes getting better at synthesizing a problem statement. But if they respond, you’ll have access to expert advice and someone who you could consult about your current approach. You’d be surprised how inclined people are to help if you clearly describe a complicated problem.
The outcome of these discussions could inspire you to create alternative solutions in case you reach a dead end and who knows what new friendships you will also make in the process.
Conclusion
In the interest of compressing all this information into a one-session-read type of blog, we have abstracted away many details, but the strategy can be used in any real-life scenario. The example discussed is actually sort of similar to something we dealt with a while ago. So it’s just a matter of testing the approach and seeing if it works for you.
Planning your way to the finish line, setting yourself up for multiple code traversals, and going through the effort of collaborating with other people might seem like a lot of work when you could have been writing the code instead.
This might be true at the beginning. But with a bit of practice, these steps can become an intuitive part of writing good code that performs at scale and can actually be applied to other types of tasks as well.
Once you get the hang of it, you will find yourself with the extra time to explore better designs, foresee any challenges, and be more certain that you’ll be delivering a high-quality solution just in time for deployment.
.png)